Introduction
Dry-aged beef was once something you’d only order at a premium steakhouse. That’s no longer the case. Demand has climbed sharply, with more people chasing that deeper, richer flavour at home. The catch is the price. Pre-aged steak can easily exceed $40 a pound, and proper dry-ageing facilities can easily cost over $500, which makes many people think even before they begin.
The good news is you don’t need a professional setup to get solid results. With a bit of control and some basic understanding, it’s possible to dry-age a ribeye at home for around $10–14 per pound, even after trimming. That’s a big saving, and it’s far more doable than most expect.
This manual takes you through the process in a realistic manner. It discusses the science of dry ageing and how one can set it up at home without making it too complex. It is founded on over 20 home ageing trials, which were centred around methods that were safe, regular, and reproducible.
What you’ll learn:
● How dry ageing works, including enzymes, moisture loss, and microbes
● Budget-friendly setups that still deliver good results
● A clear step-by-step process you can follow at home
● What changes week by week during ageing
● Common safety concerns and what actually matters
● How much you can save compared to buying pre-aged beef
Dry Ageing Science Enzymes: The Process of Tenderisation.
Dry ageing is effective due to natural enzymes that are already present in the meat, mostly calpains and cathepsins. These enzymes eventually break down muscle fibres and connective tissue, and that is why dry-aged beef can be felt much softer than fresh beef. Meanwhile, the meat gradually becomes dry. Over the course of a normal 21 to 28 days, approximately 20 per cent or 30 per cent of its water content evaporates. As this happens, the flavour becomes more concentrated and develops a deeper, slightly nutty profile.
So, two things are happening at once:
● The texture becomes easier to bite and to be soft.
● The flavour grows richer and more complex
In dry ageing, meat is exposed to air, unlike in wet ageing, where meat is sealed in a vacuum. This allows the enzymes to work more effectively and leads to a stronger overall flavour.
Microbiology: Controlled, Non-Risky.
Some people assume that dry ageing is unsafe, but this is not the case as long as it is done in an ideal way. It is based on cold-tolerant bacteria referred to as psychrotrophic bacteria. These are not bad, provided that the conditions are favourable:
● The temperature remains at a low level, below 39 F (approximately 4 C)
● Humidity is in the range of 75-85 per cent.
● The airflow is constant yet not very strong.
The inside of the meat stays protected because it remains dense, while the outer layer dries and forms a crust, often called a pellicle. This is a layer that forms a barrier. In case of mould, it is generally easy to deal with:
● White mould is mostly harmless and is like what appears on old cheeses.
● Moulds should be removed, either green or black.
Temperature control is the key point to keep in mind. The process is safe as long as the meat is kept at a temperature below 42o F. The issues start only when it exceeds this range, and harmful bacteria have an opportunity to develop.
| Phase | What Happens | Result |
| Evaporation | Moisture loss begins | Flavor concentration |
| Crust Formation | Outer layer dries (pellicle forms) | Protective barrier |
| Enzymatic Action | Muscle fibres break down | Increased tenderness |
| Umami Development | Amino acids intensify | Deep, nutty flavor |
Equipment & Setup
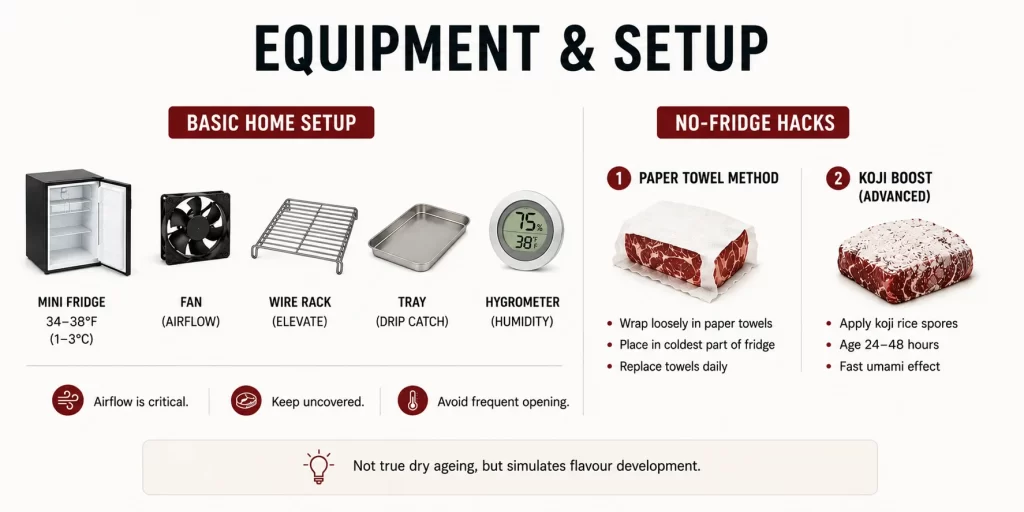
Basics: Simple Home Setup
You don’t need a professional ageing cabinet. A basic setup can be built for under $50 if you already have a fridge.
What you need:
- Mini fridge or spare fridge section (34–38°F / 1–3°C)
- Small fan (for airflow)
- Wire rack (to elevate meat)
- Tray (to catch drips)
- Hygrometer (to monitor humidity)
Airflow is critical; it prevents moisture buildup and supports even drying. Without airflow, the meat may spoil instead of ageing.
Keep the meat uncovered and avoid frequent opening of the fridge, as temperature fluctuations can disrupt the process.
No-Fridge Hacks
If you don’t have a dedicated fridge, you can still try simplified methods:
1. Paper Towel Method
- Wrap meat loosely in paper towels
- Place in the coldest part of your fridge
- Replace towels daily
This mimics surface drying but is less precise.
2. Koji Boost (Advanced Hack)
- Apply koji rice spores
- Age for 24–48 hours
- Creates a fast umami effect
This isn’t true dry ageing, but it can simulate the same kind of flavour development in a shorter time.
| Setup | Cost | Ease |
| Full fridge | $200 | Pro level |
| Fridge shelf | $20 | Beginner |
| No-fridge | $0 | Hack |
Step-by-Step Guide
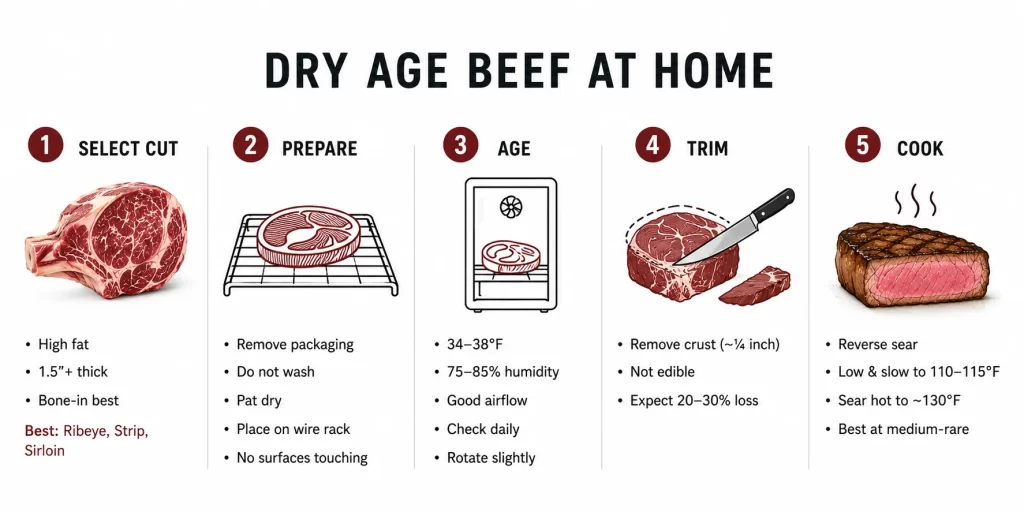
1. Select the Right Cut
Not all beef is suitable for dry ageing. Choose cuts with:
- High fat content (for flavour protection)
- Thickness of 1.5 inches or more
- Bone-in if possible (extra protection)
Best options:
- Ribeye (top choice)
- Strip loin
- Sirloin (budget option)
Avoid thin steaks; they will dry out too quickly and lose too much usable meat. Cuts like ribeye and sirloin are not only ideal for dry ageing but also provide strong protein and micronutrient value compared to chicken.
2. Preparation
- Remove packaging
- Do not wash the meat
- Pat completely dry with paper towels
- Place on a wire rack (airflow underneath is essential)
- Ensure no surfaces are touching
Keep everything clean; any kind of contamination at this stage can affect the entire process.
3. Ageing Process
Once set up:
- Maintain temperature between 34–38°F
- Keep humidity around 75–85%
- Make sure of consistent airflow
Daily tasks:
- Check temperature and humidity
- Rotate the meat slightly for even exposure
- Avoid excessive handling
Over time, you’ll notice:
- Darkening of the exterior
- Firm, dry crust forming
- Slight nutty aroma developing
Do not panic if the outside looks “too dry”; this is usually expected and necessary.
The interior remains fresh and protected.
4. Trimming
After your desired ageing period:
- Remove the meat from the fridge
- Use a sharp knife
- Trim off the hardened outer crust (~¼ inch)
This layer is not edible but has done its job protecting the inside.
Expect 20–30% loss, depending on ageing time.
5. Cooking
Dry-aged beef cooks differently due to reduced moisture.
Best method: reverse sear
- Slow cook at low heat until internal temp reaches ~110–115°F
- Sear at high heat to finish (~130°F for medium-rare)
This preserves tenderness and enhances the crust.
Avoid overcooking; dry-aged beef shines at medium-rare.
Timeline & Results
Dry ageing changes noticeably week by week, affecting tenderness, moisture loss, and flavour intensity. The longer the beef ages, the deeper and more concentrated the taste becomes, but trimming loss also increases. For most home cooks, the ideal range is 21–28 days, where flavour and texture peak without leaving excessive waste.
| Days | Tenderness | Flavor | Trim Loss | Notes |
| 7–14 | Slightly softer | Mild nuttiness | ~10% | Good beginner range |
| 21–28 | Very tender | Rich umami, buttery | ~20% | Best overall balance |
| 35–45 | Extremely tender | Funky, intense depth | ~30% | Advanced preference |
| 60+ | Ultra-soft | Blue cheese-like | ~40% | Strong acquired taste |
During the first week, most of the change comes from surface drying and early moisture evaporation. By the second and third week, natural enzymes break down connective tissue more aggressively, which gives a signature tenderness, which the dry-aged beef is known for.
At around 28 days, the meat develops the classic steakhouse-style profile: concentrated beef flavour, nutty aroma, and a firmer crust with a juicy interior. Beyond 45 days, flavours become much sharper and more fermented, which some people love, but some find it overpowering
Longer ageing also means more trimming and a higher effective cost per pound. That’s why most home dry-ageing enthusiasts stop around the 28-day mark; it delivers the best combination of flavour, tenderness, and value.
Safety Myths Busted
Many people avoid dry ageing at home because they assume it is quite unsafe, but most concerns come from a misunderstanding of how the process actually works. When the temperature, airflow, and cleanliness are controlled, dry ageing is considered safe for whole cuts of beef.
| Myth | Fact |
| Mould means the meat is spoiled | White surface mould is usually harmless and trimmed off before cooking |
| Home dry ageing is dangerous | Safe when kept below 39°F with proper airflow |
| Bacteria spread through the meat | Bacteria stay mainly on the surface; the interior remains protected |
| Any dark crust means spoilage | The dry outer crust is normal during ageing |
The biggest safety factor is temperature. Harmful bacteria grow rapidly above 42°F, which is why maintaining a fridge range of 34–38°F is very important for you. Airflow also matters because stagnant moisture can encourage unwanted microbial growth.
Another common misconception is that dry-aged beef should smell “rotten.” Properly aged beef develops a nutty, earthy, or slightly cheesy aroma, not a sour or putrid smell.
As long as you use fresh meat, maintain stable conditions, and trim the exterior crust before cooking it, home dry ageing is a controlled and safe process.
Cost Analysis
One of the biggest advantages of dry ageing beef at home is the long-term cost savings. Premium steakhouses and butcher shops usually charge you $35–$40 per pound for dry-aged ribeye because of labour, storage time, and trimming loss. At home, you can easily achieve the same kind of results for far less price.
A fresh ribeye roast may cost you around $10 per pound. During the ageing process, the meat loses out the moisture and develops a hardened outer crust that should be trimmed away. After roughly 20–30% weight loss, your effective cost usually rises to about $14 per pound of usable meat, still very much cheaper than buying pre-aged steak.
| Type | Approx. Cost per lb |
| Fresh ribeye | $10 |
| Home dry-aged (after loss) | $14 |
| Store-bought dry-aged | $40 |
The savings become even more noticeable with larger batches. For example, ageing a 10-pound ribeye at home could cost roughly $140 total after trimming, while purchasing the same amount pre-aged may exceed $400. That’s a potential savings of over $250 on a single batch.
Even with a simple setup, dry ageing at home provides you with a strong value, especially for people who like to have steak regularly
Conclusion
For most home setups, a 28-day dry-aged ribeye delivers the best balance of flavour, tenderness, and cost. With just having basic gear and controlled conditions (34–38°F, airflow, low handling), you can easily achieve the steakhouse-quality results at roughly $14/lb vs $40/lb store-bought. The process is quite safe, repeatable, and doesn’t require you to have expensive equipment. You should stick to thick, well-marbled cuts, trim properly, and use reverse sear for the best finish. Once you give it a try, dry ageing at home will become quite a reliable, high-value upgrade.
FAQs
1. What is the best cut for dry ageing at home?
Ribeye is the top choice due to its fat content, which protects the meat during ageing and enhances flavour. Strip loin is a close second, while lean cuts are less forgiving.
2. What temperature should I maintain?
Keep your fridge between 34–38°F (1–3°C). This is the most critical factor for safety and proper ageing.
3. Is mould on dry-aged beef safe?
White mould is generally safe and similar to what you’d find on aged cheese. It stays on the surface and is removed during trimming. Any dark or fuzzy mould should be trimmed aggressively.
4. How long should I age beef at home?
For most people, 21–28 days is ideal. It delivers strong flavour improvements without any kind of excessive trimming loss or overpowering taste.
5. Do I need a dedicated fridge?
Not necessarily. A stable fridge section with minimal disturbance, proper airflow, and consistent temperature can work just fine.
6. Why does dry-aged beef taste different?
It’s a combination of moisture loss (which concentrates flavour) and enzymatic breakdown (which improves tenderness and releases amino acids responsible for umami taste).